Having enough storage in your entry area is critical if you don’t want to end up with piles of mess by your front door. Otherwise, coats, shoes, umbrellas, homework papers, keys, and random things collect on any nearby surface.
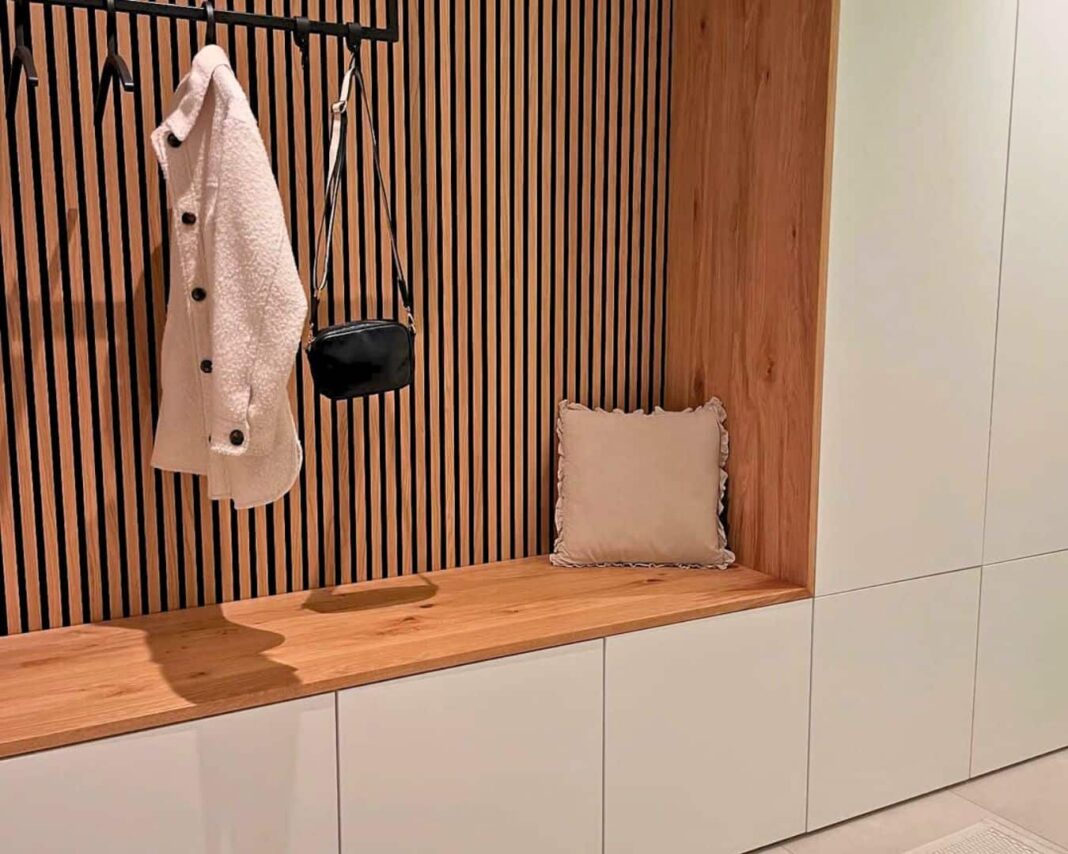
Elena (@stilvoll.interior) decided to kick things up a notch when it came to their entryway, replacing their basic dresser with cabinets that maximized the vertical space.
Elena uses the PLATSA system, creating the look of built-in storage and adding a bench seat for putting on and removing shoes. Now, if you’re in the US, you won’t find this system on IKEA’s website but you can easily create a similar version using a different IKEA series.
For example, you could apply Elena’s hallway hack to the popular PAX or BESTÅ systems to get a comparable look.
No matter how you decide to approach the products, this hack is worth checking out if you’re on the prowl for a more pulled-together, sophisticated entryway. This idea would also work well to supercharge your storage in an underutilized hallway. See what you think!
What You’ll Need
- PLATSA (or similar system) Frames and Panels (How many depends on the size space you want to fill and your storage preferences)
- Acoustic Panels
- Wood for the bench seat
- Timber for framing
- White panels
- Screws
- Adhesive
- Accessories (coat hooks, etc)
- Tape Measure
- Pencil
- Screw gun/Drill
- Saw
The supply list on this one doesn’t get too specific because it really depends on how you plan to configure your unique storage layout. It also depends on what system you end up using, since the PLATSA series isn’t available in the US. But this hack looked incredible, and a lot of hard work went into it, so we had to show it off.
Creating the Ultimate Hallway and Entryway Storage Solution
1. Assemble the IKEA Pieces
Assemble all of your IKEA frames, cabinets, drawers, etc., according to IKEA instructions. Make sure to measure the area you want to fill to order the appropriate number and configuration of pieces. IKEA offers comprehensive planning tools for PLATSA, BESTÅ, and PAX, so take advantage to make the design as hassle-free as possible.
2. Secure the Frames
Add extra stability by securing the cabinets and frames to the wall using appropriate hardware. When I set up a PAX wardrobe in my last house, I removed a length of my baseboards to get the wardrobe right up against the wall, then secured it to wall studs through the back of the unit.
I have seen other people add timber to the wall to account for the baseboard and simply trim around the cabinet to create a built-in look and cover the gaps. Therefore, you decide what works best for your situation.
3. Add Panels and Trim
Mount the acoustic panels or any other type of decorative panel you want to the wall behind where your bench will go. Use timber to frame out the gaps between the cabinets and ceiling, and add white panels to create a finished look. If you have shorter ceilings and the cabinets almost reach them, you could simply add trim or crown molding.
4. Complete the Bench
Use your wood pieces to finish off around the bench and add the bench seat. Attach using heavy-duty adhesive so you don’t have visible screw holes. Elena used wood she got from a sawmill and varnished it for a natural, sleek look.
5. Accessorize as Desired
After you’re finished with all the DIY building and installation, add a few finishing touches. Hooks for coats and hats add extra storage space. A soft pillow on the bench invites guests to sit down to take off their shoes and provides a dash of charm.
Enjoy the Inspiration, But Make It Your Own
I think this hack is definitely one that inspires, but you need to add your own tweaks and adjustments to it. Primarily, this is because there’s no PLATSA system on IKEA US site. Still, there are plenty of entryway and hallway hacks that use other systems, often combining several products, like this PAX and NORDLI creation.
Also, what products you get depends greatly on what size space you want to fill. Then you need to consider what style goes best with the rest of your house, and what you plan to store in your new, custom entry.
But overall, this hack turned out amazing, so it’s worth sharing and hopefully will inspire you to create a statement in your hallway or foyer that makes your home all the more beautiful and functional. What do you think?
Watch the hack and follow ELENA @stilvoll.interior for more DIY projects and inspiring transformations.
Got an IKEA hack that you can’t wait to show off? Send it our way and you could be our next featured hack.

